top of page

PATINA LANE by Linda Carter Designs

ree

Step 1: Trims & Appliques

ree

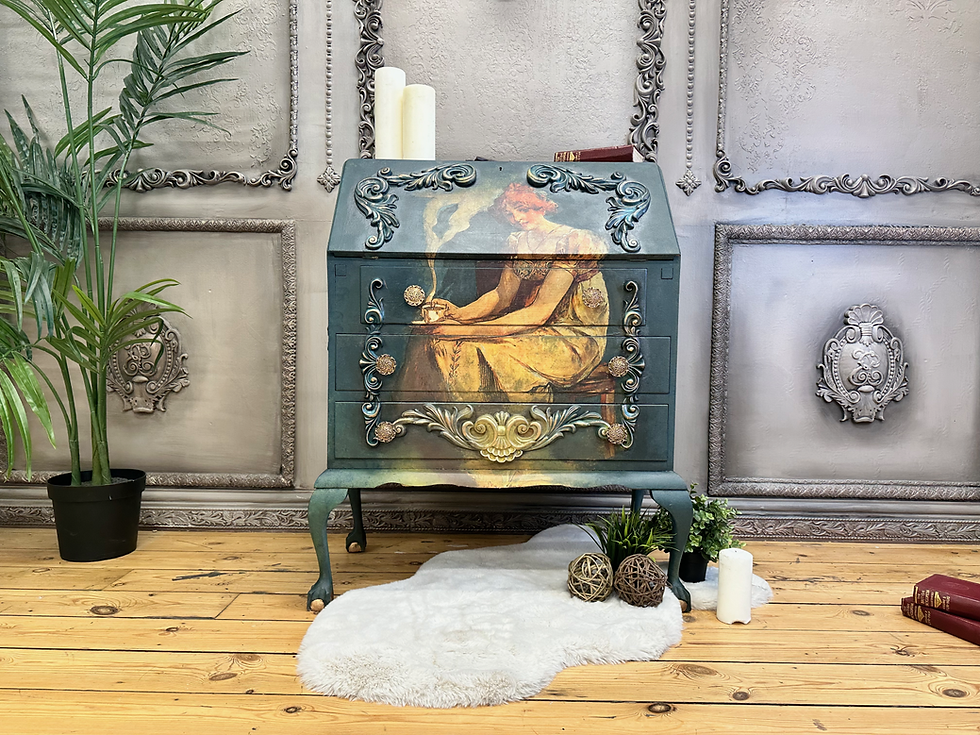
We began our latest art project with an undecorated cabinet made from MDF board as our blank canvas. Our first port of call was attaching WoodUbend trims to the top and bottom of our cabinet, starting with 0020IE.1 on the bottom edge. First, we thoroughly warmed the trim with a heat gun until it was flexible before cutting off an appropriately sized section. We did this due to how thick this specific trim is; it would have been very awkward to try and wrap it around our cabinet in one single application.


As we knew these sections of trim would need to form mitred joints on the corners, we cut them at a 45 degree angle. Next, we applied some WoodUbend WoodUglue to our surface, using a small paintbrush to spread it until the entire available surface was covered. After gently heating the WoodUglue with a heat gun to activate it, we pressed our trim down onto the surface. To complete the adhesion we then warmed the trim up once more in situ, before pressing it down again and wiping away any excess glue that leaked out with a wet paintbrush. As our trim wrapped around the bottom of our cabinet, there were two mitred corners where sections of our trim joined.


To make these corners perfect mitred joints, we first shaved off the excess trim with a knife. Then we sanded these corners down until we had created a natural looking smooth connection. Now our first trim was successfully adhered to our cabinet we moved on to attaching TR725. We, again, first heated our trim and applied WoodUglue but this time to the top edge of our cabinet.

As this trim was significantly thinner, it was easier to wrap around our cabinet so cutting sections out and mitring corners was not required this time. Once this trim was fully adhered to the surface, we simply cut off the unneeded excess and cut along the opening and hinges of the doors.


Our final step in this first stage of our art project was to attach the WoodUbend applique WUB1301. Following the same steps as our trim applications, we heated up and applied WoodUglue to three of our WUB1301 appliques. They were then attached to a different panel each, one applique being positioned on each side of the cabinet excluding the back side. As one of these was positioned in the centre of the front panel we also cut this down the middle to allow our doors to open.

ree

Step 2: Painting & Athenian Plaster

ree

Our next step was to paint our cabinet and start creating the textured effect we desired for this art project. We began by applying a base coat of Royal Green by Magic Paint to the entire surface of the cabinet. Once we had allowed this to dry, we decanted a few scoops of Posh Chalk Athenian Plaster into a convenient plastic tub and mixed in a few drops of the Posh Chalk Rich Ochre Colour Kick. Once this was thoroughly mixed we began dabbing it onto our surface with a sea sponge.


We did this one panel at a time, using a Posh Chalk Premium Finishing Trowel to flatten the coloured Athenian Plaster while it was still wet before moving onto the next panel. After we had completed this process on three of the panels and allowed our plaster to dry, we sanded down the panels first with sandpaper and then with a belt sander. This is to help create the polished textured effect we were aiming for.


Next we coloured some more Athenian Plaster, this time with the Posh Chalk Royal Indigo Colour Kick. This was layered on top of our previously applied Athenian Plaster in the exact same fashion, stopping to smooth out the coloured plaster with a finishing trowel as we went. Once our Royal Indigo Athenian Plaster had dried, we decided to polish the piece to create a textured and glossy finish. To do this we went over the entire piece using a belt sander.

ree

Step 3: Detailing

ree

Entering the final stage of our art project, we decided to create some shading. For this we selected the Posh Chalk Dark Brown Patina and began stippling it on around the appliques using a Posh Chalk Mouldings Brush. This technique and brush was used to ensure Patina got into all of the nooks and crannies of our applique. Once satisfied with the shading effect we had created, we then used a Posh Chalk Wax Extender Brush to apply a coat of Posh Chalk Patina Extending Wax to our piece. We began on the area we had applied patina earlier, to make the shading somewhat more subtle, before moving on to the rest of the cabinet.


This adds to the glossy finish we were creating as well as acting as an outdoor grade sealant which protects your piece from any elements it could be exposed to. We then wiped away any excess wax left on the surface with a cloth. The final step to complete this art project was to add some detailing. The Posh Chalk Pale Gold Patina was perfect for this, so we gently dry brushed it over the peaks of our mouldings and trims across the entire piece.

ree

Products Used:


ree

We adore crafting with Decoupage, even with furniture that we have previously transformed. Such was the case with this piece of furniture that unfortunately did not match the style of the room it ended up living in. As such, we decided to overhaul its look using a mixture of Posh Chalk Deluxe Decoupage, WoodUbend Appliques, WoodUbend Trims, Posh Chalk Pastes and Posh Chalk Pigments. Read on for a full breakdown of how we completely transformed this old dressing table mirror.


Step 1: Crafting with Decoupage: Application

ree

When crafting with Decoupage, the first step  is to paint the chosen surface in white. This is done to make the colours on the somewhat translucent Posh Chalk Deluxe Decoupage Paper pop (we had decided to use Clear Sand by Magic Paint). This is especially important for projects like ours where the furniture piece has some remnants of an old coat of paint left on its surface which would show through the design otherwise. This was done on both the top surface of the Dressing Table as well as the front panel of the drawer as we had decided to use decoupage on both.


We then allowed these painted surfaces to dry and cut out our desired sections of decoupage, we were not going to need to blend the edges of our decoupage in this case so this was done in straight lines with scissors. As our surfaces were rather small and we had opted to use the Bouquet of Flower and Posh Script Decoupage Designs in A1 sizes, we had a lot of decoupage paper left over after cutting out our desired sections so we set these to the side for use on future projects.


Now it was time to start applying, we started by brushing a thin layer of the Posh Chalk Pigment Infusor to the front panel of the drawer while lightly spritzing the surface with water due to how dry the wood had become. We then placed the cut-out section of ‘Bouquet of Flowers’ onto our surface and smoothed out any creases with a dry Posh Chalk Large Smooth & Blend Brush; starting in the centre, lifting and stretching sections as we went. We also folded the excess Decoupage over the corners of the drawer and carried out the same process. This was done to create a seamless finish.


To complete this application, we applied another layer of the Posh Chalk Pigment Infusor, fully saturating the surface to ensure a strong adhesion. The infusor also acts as an outdoor-grade sealant which protects the Decoupage from any elements it may be exposed to. After we were satisfied with the application and had allowed the surface to dry somewhat, any excess that was not stuck down earlier was trimmed off using a knife.


This process was then repeated to adhere the section of the Posh Script Decoupage onto the piece’s top panel. This second application presented a slight challenge as the Dressing Table had a screw sticking up that was not removable. We had to allow this to push through the decoupage and then ensured the writing on the design lined up straight with our surface before completing the adhesion process. We never said that crafting with Decoupage was easy!

ree

Step 2: WoodUbend Application

ree

Next, it was time to put our WoodUbend Appliques and Trims onto our piece. We had opted to use the TR743 Modern Bead trim to create a border around our mirror, and we began by warming it up with a heat gun. Once our trim was nicely warm and malleable, we put a thin strip of glue along the entire surface we wanted our border to rest on, then spread this around with a dry paintbrush to ensure there was glue covering the same amount of area as the trim’s footprint.


As the mirror has squared right-angle corners, we realised the easiest way to create a seamless border would be using a mitring technique. To do this we adhered strips of trim to each straight edge of the mirror, leaving a small amount of overlap on each corner. Next, to ensure the adhesion was completed, we warmed up the middle section of our freshly applied trim in situ and pressed it onto the surface firmly. Then, while they were still warm and easy to manipulate, we cut the overlapping end pieces off and pressed the sides together to fuse them.


In some corners, we had to use sandpaper to make the join look seamless. We then removed any excess glue that had leaked out from under our trim with a wet paintbrush. Using the same application techniques, we also attached the WoodUbend Applique WUB2152 to the top section of our mirror and wrapped the TR743 Trim around the bottom edge of the base section.


ree

Step 3: Painting with Pastes & Pigments

ree

Now it was time to begin painting! To best match the style we were trying to achieve, we selected the Posh Chalk Metallic Brown Van Dyke Paste and began painting the entire mirror section using a Posh Chalk Mouldings Brush.


As we progressed, we gently spritzed the surface with water to dilute the paste in situ and help create a lovely vintage feel that would much better match the rest of the decor in the room it will be used in. The Brown Van Dyke paste was then applied to both of the arms that hold the mirror up, the sides and bottom of the base section and the sides of the drawer. This keeps the piece cohesive looking and created a fantastic seamless finish when fully assembled again.


Once we were satisfied with this paint job, we decanted some of our Posh Chalk Pale Gold Pigment onto a WoodUbend board and gradually added Posh Chalk Pigment Infusor until we had created a thick golden paste. Our freshly created pigment mixture was then used for detailing around the piece. The trims we had applied were coated with it as well as the boarder edge around the top surface where we had used the Posh Script Decoupage and wooden pieces that hold the mirror in place. Then finally, we gently brushed some onto the peaks of the applique that we placed at the top of the mirror.


ree

Step 4: Ageing & Shading

ree

To complete the vintage feel we had been aiming for we decided to create a glaze coloured with Magic Paint’s Profumo d’Oriente. After gently brushing this across the surface where we had applied our Posh Script Decoupage, we wiped the excess away with a cloth leaving us with a subtle yellowing on the previously white surface. Finally to complete our piece we used the Posh Chalk Black Patina to create a shading effect by applying it around all of the different edges on our piece.


We then used our Posh Chalk Patina Extending Wax to blend this into the rest of the piece with a Posh Chalk Wax Extender Brush, creating natural looking shading across the whole piece. As well as helping to create an aged look and hiding any potential imperfections, this also provides a protective outer layer. We now loved the way the dressing table looked…hopefully you understand why we adore crafting with Decoupage so much!

ree

In conclusion, our project to overhaul the dressing table mirror’s look by crafting with decoupage has been a resounding success. By combining all of these techniques and products, we’ve transformed the piece into a beautiful and cohesive addition to the room. The applique and trim create a stunning border around the mirror, the metallic brown and pale gold paint jobs add a touch of elegance and the ageing and shading techniques used to create a vintage look have further enhanced the piece’s aesthetic appeal. With this project, we’ve not only given new life to an old piece of furniture but also demonstrated the versatility and creativity of using Posh Chalk and WoodUbend products in your projects!


Products Used: Which can be found online at Patina Lane,, linked below


ree

Are you tired of the same old furniture in your home, but don’t want to break the bank or sacrifice your sense of style? In this post, we’ll be showing you how we gave new life to an old Secretary Desk, turning it from a dusty relic of the past into a functional and eye-catching piece that’s perfect for any room. We’ll take you through each step of the process, so you can get creative and give your old pieces of furniture a fresh new look.

We broke the whole process down into 5 comprehensive steps, so if there is any specific technique or product we used on this project that interests you it is easily replicated.


Step 1: Decoupage Application


ree

For this project, we decided to use the Posh Chalk ‘Posh Tea Time’ Deluxe Decoupage in size A1. First of all we tore off the edges of our decoupage using a water pen, doing this instead of cutting the edges with scissors makes the colour blending much easier later on. We then painted the area of the desk it was going to be applied to, this white base would make the decoupage colours really pop


After this paint dried we applied a thin layer of our Posh Chalk Pigment Infusor and began the application of the decoupage. Due to how large the piece of decoupage is, we applied this first layer of Infusor in two stages: the top half was stuck down and smoothed out, before Infusor was applied to the bottom half. After this was firmly stuck down in the correct position we then applied a top layer of Infusor, more liberally this time, to complete the application. The infusor also acts as an outdoor-grade sealant protecting the decoupage from any potential wear and tear.


Step 2: Mounting WoodUbend Appliques


ree


The next step was getting our WoodUbend Appliques mounted onto the furniture. We first selected the range of different moulding designs we wanted for the front of the desk and experimented with arrangements a little until we defined exactly where we wanted them to be positioned. One of the appliques we chose (WUB1261A) had two scroll designs connected via a centrepiece. We decided that these scrolls would be perfect for our design but we did not need this connecting piece. So, we warmed the applique up and used a knife to cut the desired parts free, then sanded down the cut edge until it was smooth. We then heated the rest of these appliques (see the bottom of the page for the full list) to get them ready for mounting and applied a good quality wood glue to the entire footprint of each applique before firmly pressing them into place.


Then, we heated them once more in situ to ensure a strong adhesion. Some of our appliques didn’t quite fit within the area we had due to where the drawer handles needed to be, in those cases the ends were cut off during the mounting process. Finally, we went around the edges of the appliques with a wet paintbrush to remove any excess glue that leaked out. This was then repeated for the two side panels of our desk. After this was completed the decoupage and appliques on our front panel had fully dried, allowing us to cut along the drawer openings to ensure the desk still functioned properly.


Step 3: Colour Blending with our desk makeover


ree


Now it was time to paint the piece. We loved the background colour of our decoupage design so we started blending a mixture of Olivia and Pepper Blue by Magic Paint on the furniture itself to try and extend this background colour around the full piece. This colour combination worked perfectly with the decoupage background so we continued the blending process around the full piece; using a Posh Chalk Mouldings Brush, a Posh Chalk Stencil Brush and a Posh Chalk Smooth & Blend Brush on different areas.


We were also lightly spritzing the area we were painting with water as we wanted to help ensure our paint would get into all the nooks and crannies of our appliques. Also due to the layer of Infusor we had applied earlier, it made it easy to remove any paint that accidentally overlapped onto our decoupage’s design by wiping it away with a baby wipe.


Step 4: Stencilling & Pigments


ree

Next we decanted some of our Posh Chalk Bronze Alloy Pigment onto an old WoodUbend moulding board and gradually added some of our Posh Chalk Pigment Infusor until we had the thick paste-like consistency we desired. We then selected the Posh Chalk Moroccan Vibes Premium Stencil to feature on the sides of our piece and used a spray mount to adhere it centrally on one of those sides. We then stippled on layers of Pepper Blue, Olivia, Orange, Yellow and Brown by Magic Paint and finally a layer of our Bronze Alloy Pigment mixture.


We used the same Posh Chalk Stencil Brush throughout, allowing our colours to mix on the brush and in situ. This was repeated until the area of the side panel within our WoodUbend Applique boarder was filled. We also used slightly less pressure and paint on the extremities to create a subtle fading effect. After we replicated the stencilling on the opposite side of the piece, we gently dry brushed the Bronze Alloy Pigment mixture over all of the mouldings on the sides of our piece to tie the colours together.


Step 6: Shading & Wax


ree


The final touches required for our project was to create some depth with subtle shading, and then seal it with wax as we had used the chalk based Magic Paints earlier. To create this shading we selected our brand new Jet Black Posh Chalk Aqua Patina and began painting a thin border around all of our appliques. Once our border was created, we spritzed the surface with water to feather the shading out, making it blend into the rest of the design to achieve the discreet shading effect we desired.


Finally, in order to seal our piece, we used a Posh Chalk Wax Extender Brush to apply a layer of our Posh Chalk Patina Extending Wax over the entire surface of the piece. This wax dries clear and acts as a sealant so it was absolutely perfect for this use!


Posh Chalk Deluxe Decoupage Posh Tea Time


Posh Chalk Pigment Infusor


Posh Chalk Smooth and Blend Brush


WoodUbend Applique WUB1261A


Woodubend Applique WUB1418


Woodubend Applique WUB1388-9


Woodubend Applique WUB1320


Woodubend Applique WUB1723


Woodubend Applique WUB1364.48


WoodUbend WoodUglue


Posh Chalk Stencil Moroccan Vibes


Posh Chalk Pigments Bronze Alloy


Posh Chalk Premium Stencil Brush


Posh Chalk Aqua Patina Jet Black


Posh Chalk Aqua Patina Blue Prussian


Posh Chalk Aqua Patina Primary Green


Posh Chalk Precious Aqua Patina Radiant Gold


Posh Chalk Patina Extending Wax


Posh Chalk Wax Brush


Posh Chalk Stencil Brush


Posh Chalk Moulding Brush


Posh Chalk Wax Extender Brush


Posh Chalk Smooth & Blend Brush Large


PATINA LANE by Linda Carter Designs


Follow us on all of our social media for exclusive content!!

Thanks for submitting!

  • Youtube
  • Instagram
  • Facebook


Painted Tree Boutiques (inside)

5407 Cypress Creek Pkwy

 Houston, Texas, 77069

© 2018 by Patina Lane

Proudly created with Wix.com


713-410-3439

bottom of page